
How to Use your Saladmaster Electric Skillet and Mp5
How Getting Started and General Tips | Electric skillet |Saladmaster healthy cooking
Saladmaster Fried Eggs TIPS!
Saladmaster Over Easy Eggs
Saladmaster Electric Skillet (Sizes 10" & 12")
Baking in the Saladmaster Electric Oil Core Skillet

Baking in the Saladmaster Electric Oil Core Skillet
Utensil: Saladmaster 12 in. Electric Oil Core Skillet
- Follow the ingredient and mixing instructions on the box.
- Preheat skillet, with the cover on, to 250°F/120°C.
- Place batter in skillet, cover, and raise heat to 300°F/150°C.
- Set digital probe timer to cook for the specified time on the box, using the time for the 9 in. pan size on the box.
- When time has elapsed, allow to cool approximately one hour in the skillet. Run knife around edge of cake to loosen from skillet, if needed.
- Invert cake onto platter for serving. Ice or decorate cake as desired.
Tips:
- When removing the cover after the cooling period, immediately turn the cover over, upside down, so the moisture that has accumulated on the inside of the cover does not drip onto the cake.
- Spray the pan lightly with a cooking oil spray just prior to placing batter into skillet or cut parchment paper to fit the bottom of the skillet; it will allow the cake to be easily removed.
- If you do not set the timer, simply unplug the skillet after the proper cooking time and allow to cool approximately one hour.
- These instructions can be followed for any type of box cake mix (e.g. chocolate, white, carrot cake).
Saladmaster Temperature Control Probe Magic
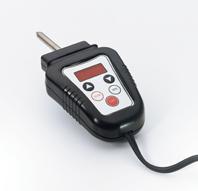
Saladmaster Temperature Control Probe Magic
Just peek at a few more ideas that your temperature control probe rice settings can achieve:
- Automatically cook rice, vegetable and meat combinations
- Automatically cook lasagna
- Automatically cook your favorite casserole
There are two automatic rice settings on your temperature control probe. They are set by pressing the TEMP button and then pressing the down arrow (press once for Rice 1 and twice for Rice 2); you then press TEMP again to start the process. The cookbook says you can ignore the Rice 2 setting, but as you will see, there can be great value in the Rice 2 setting for many “non-rice” recipes. To get the greatest value from the Rice 1 & 2 settings, it is helpful to know how they are programmed: Rice 1 takes the temperature to 250°F/121°C, then drops and holds the temperature at 200°F/93°C for 20 minutes and then drops and holds the temperature at 150°F/ 66°C (the lowest setting) for 12 hours; Rice 2 takes the temperature initially to 265°F/129°C degrees and then drops the temperature as on Rice 1.
This may sound a lot like how your Saladmaster cookware works: you place your skillet on medium heat, wait for the Vapo-Valve™ to click, and then turn the heat to low. Well the rice settings achieve the same goal - except it does it automatically!
Just look at these recipes to see how simple this works:
Lasagna
Coat the bottom of your EOC with approximately 12 oz/340g of your choice of spaghetti sauce. Then place two layers of crisscrossed lasagna noodles. Place 8 oz/227g of ricotta cheese on top of the noodles. Add two more layers of noodles. Add 12 oz/340g spaghetti sauce. Add crisscrossed noodles. Add a layer of 8 oz/227g ricotta cheese. Add crisscrossed noodles. Add 12 oz/340g spaghetti sauce over the top. Using the Saladmaster Machine with Cone #2, grate 8 oz/227g mozzarella cheese on top of the sauce.
Place lid on EOC, set the temperature control probe on Rice 1 and then simply forget it! It’s usually done in 30-40 minutes but you can leave it several hours without burning because you are cooking in a partial Saladmaster vacuum. And in case you didn’t notice, you don't have to pre-cook your noodles!
If you add a lot of meat and veggies to the sauce layers, simply set the temperature control probe to the Rice 2 setting.
Chicken/Veggies and Rice
Preheat your EOC or MP5 to 250°/121°C. Thinly slice chicken, enough to cover the bottom of the pan, and brown. Turn off temperature control probe. Turn meat and pour off any grease or liquids from chicken. This first browning step is optional because the remaining cooking process cooks the chicken - you can start with just the thinly cut raw chicken strips. Pour 1 ½ cups/285g of dry brown or white rice on top of the chicken. Pour 3 cups/700mL of water over rice. Place 1 pound/ 454g frozen veggies of your choice into the pan.
Set temperature control probe to Rice 1 until done. Usually about 30-40 minutes but you can “set-and-forget” as in the lasagna recipe above. You can use Rice 2 setting if you are doubling up on the recipe. When your dish is cooked, stir the veggie/chicken/rice mixture together and serve. Add soy sauce or your favorite sauce to taste.
Casserole
Now that you've tried a couple of recipes with your temperature control probe, it's time for you to get creative and convert one of your own favorite casseroles to the set-and-forget-automatic Saladmaster method.
Select your favorite casserole dish. Layer your ingredients. Then use the Rice 1 or Rice 2 settings accordingly.
If you are using hamburger meat in your sauce, pre-cook the meat in your Saladmaster steamer unit. The steamer unit pulls more grease out of meat and helps meat retain more flavor.
Once you expand on these recipes, the sky is the limit on the culinary possibilities!
Converting Recipes to Saladmaster

Converting Recipes to Saladmaster
Today we’re going to talk about converting a recipe that calls for cooking in the oven to cooking it in the Electric Oil Core Skillet.
Here are the ingredients of a typical Chicken Tortilla Casserole recipe:
11 ounces mushroom soup
11 ounces cream of chicken soup
1 onion, chopped
8 ounces green chilies, chopped
4 chicken breasts
14 - 16 corn tortillas
1 pound cheese, grated
11 ounces ripe olives, sliced
To start with, the Saladmaster Food Processor will grate your cheese, chop your olives, onions and chilies in no time flat. You’re already ahead of schedule right from the beginning.
Next you would blend the first four ingredients together and set aside.
But here are the big changes. This traditional recipe would call for the chicken to be placed in a greased baking pan and baked for 1 hour in the oven at 450°F/232°C. But with the Electric Oil Core Skillet, you simply place the chicken in the ungreased skillet (meaty side down), cover and set controller to 250°F/120°C. When the Vapo-Valve™ clicks, turn chicken. When the Vapo-Valve™ clicks again, reduce heat to low (150°F/65°C) and continue to cook for 15 minutes.
In a normal recipe it would then call for the entire assembled recipe to be cooked in another greased pan for 1½ hours in a 300°F/149°C oven.
But with Saladmaster, simply take the chicken out of the electric skillet and dice. Then in the same skillet, layer tortillas, half the chicken, half the sauce mixture and half the cheese. Repeat and place olives on top. Cover and place temperature control on 150°F/65°C and cook for only 45 minutes.
So let’s do a quick review of how this one cooking recipe conversion helps you and your family:
- You are saving half the time both on the front-end preparing the food and on the back-end when you’re cooking the food. When your hungry family is clamoring for dinner and you have a million places to go, you know you can prepare a meal quickly and easily.
- You are saving the high calories that adding oils bring to your food.
- And think of the energy savings by cooking in your Electric Oil Core Skillet (or on top of the stove in any Saladmaster skillet) instead of heating up your oven.
Your Safety Is Our Concern
- Check the handles on the appliance and tighten any loose screws when necessary.
- The pressure relief valve for the unique Saladmaster® “Oil Core” is guarded by the handle. It is important to have handles in place at all times. Do not operate this appliance without both handles securely in place.
- If the appliance is dropped or the handles are broken, check for damage to the pressure relief valve. If parts are dislodged or if you notice oil leaking from under the handle, contact your distributor for service. Do not tamper with the pressure relief valve under any condition.
- Always dry outside of appliance completely before connecting heat control.
- Never immerse hot appliance in water. Always allow it to cool before cleaning.
- To reduce the hazard of potential electrical shock, this item has a polarized plug which is designed to fit only one way in a polarized outlet.
- A short cord is provided to reduce the risks of becoming tangled in or tripping over a longer cord. Extension cords are not recommended.
-
When using any electrical appliance, basic safety precautions should always be followed, including the following:
- Read all instructions.
- Do not touch hot surfaces. Use handles and knobs. Do not operate the electrical appliance without handles in place.
- To protect against electrical hazards, do not immerse core, plugs, or heat control in water or other liquid.
- Saladmaster® electrical appliances are not intended for use by young children or infirm persons without supervision.
- Unplug from outlet when not in use and before cleaning. Allow to cool before putting on or taking off parts.
- Do not operate any appliance with a damaged cord or plug, or after the appliance malfunctions or has been damaged. Return appliance for examination and possible repairs.
- The use of accessory attachments not recommended by the appliance manufacturer may cause injuries.
- Do not use outdoors.
- Do not let cord hang over edge of table or counter, or touch hot surfaces.
- Do not place on or near a hot burner or in a heated oven.
- Use extreme caution when moving an appliance containing hot oil or other hot liquid.
- Always attach plug to appliance first, then plug cord into wall outlet. To disconnect, press the off button, then remove plug from wall outlet.
- This appliance has a polarized plug (one blade is wider than the other). To reduce the risk of electrical shock, this plug is intended to fit into a polarized outlet only one way. If the plug does not fit fully into the outlet, reverse the plug. If it still does not fit, contact a qualified electrician for assistance. DO NOT ATTEMPT TO MODIFY THE PLUG IN ANY WAY.
- Do not use appliance for other than intended household use.
- Do not tamper with pressure relief valve behind handle. If oil leaks from under handles or from any part of the appliance, do not use. For repairs, see warranty.
- After cleaning, the appliance inlet (where the electrical connector plugs in) must be thoroughly dried before appliance is used again.